Angular2でComponentにURLのパラメータを引き渡す方法
前回の記事の続きです。 次はURLに指定されたパラメータをコンポーネント側で受け取って表示してみます。
以下のようなリクエストを送るものとします。
http://127.0.0.1:8080/#/friend/1234
この「1234」をコンポーネント側に渡したい。
そのためにはどうしたらいいか?
まずはRoutesにパスを設定します。
app.routing.ts
import { Routes, RouterModule } from '@angular/router';
import { HomeComponent } from "./home";
import { TestComponent } from "./test";
import { FriendComponent } from "./friend";

const routes: Routes = [
    {path: '', component: HomeComponent},
    {path: 'test', component: TestComponent},
    {path: 'friend/:id', component: FriendComponent}
];

export const routing = RouterModule.forRoot(routes);
以下の
{path: 'friend/:id', component: FriendComponent}
で、「#/friend/1234」の部分を定義しています。
:idに「1234」が対応します。
引き渡す側はこんな感じ。
friend.ts
import {Component} from '@angular/core';
import {ActivatedRoute} from '@angular/router';

@Component({
    selector: 'friend',
    template: '<h1 class="friend">Friend ID is {{friendId}}</h1>',
    styles: ['.friend {background:red}']
})
export class FriendComponent {
    friendId: string

    constructor(route: ActivatedRoute) {
        this.friendId = route.snapshot.params['id'];

        console.log("friend id = " + this.friendId);
    }
}
こうすれば、以下のように表示されます。

Angular2でルーティング機能を実装する
Angular2でルーティング機能を実装してみます。 Single Page Applicationでは、URLを変更することで、サーバにリクエストを送ることなく、画面に変化をつけることができます。
HashLocationStrategyというのは、ハッシュサイン(#)をURLに付け加えることで、URLを区切る方法です。
今回のサンプルではこのやり方を使います。
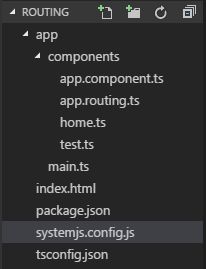
ディレクトリ構成は以下のとおりです。

まずはお作法的なファイルからです。
package.jsonを配置して、npm installしてください。
{
  "name": "router-sample",
  "version": "1.0.0",
  "description": "Routing samples",
  "homepage": "",
  "private": true,
  "scripts": {
    "start": "live-server"
  },
  "dependencies": {
    "@angular/common": "^2.4.0",
    "@angular/compiler": "^2.4.0",
    "@angular/core": "^2.4.0",
    "@angular/forms": "^2.4.0",
    "@angular/http": "^2.4.0",
    "@angular/platform-browser": "^2.4.0",
    "@angular/platform-browser-dynamic": "^2.4.0",
    "@angular/router": "^3.4.0",
    "@angular/material": "^2.0.0-beta.2",
    "core-js": "^2.4.1",
    "rxjs": "^5.1.0",
    "zone.js": "^0.7.6",
    "systemjs": "0.19.37"
  },
  "devDependencies": {
    "live-server": "1.0.0",
    "typescript": "^2.0.0"
  }
}
SystemJSの設定ファイルです。
systemjs.config.ts
System.config({
  transpiler: 'typescript',
  typescriptOptions: {emitDecoratorMetadata: true,
    target: "ES5",
    module: "commonjs"},
  map: {
    '@angular': 'node_modules/@angular',
    'rxjs'    : 'node_modules/rxjs'
  },
  meta: {
    '@angular/*': {'format': 'cjs'}
  },
  packages: {
    'app'                              : {main: 'main', defaultExtension: 'ts'},
    'rxjs'                             : {main: 'Rx'},
    '@angular/core'                    : {main: 'bundles/core.umd.min.js'},
    '@angular/common'                  : {main: 'bundles/common.umd.min.js'},
    '@angular/compiler'                : {main: 'bundles/compiler.umd.min.js'},
    '@angular/http'                    : {main: 'bundles/http.umd.min.js'},
    '@angular/router'                  : {main: 'bundles/router.umd.min.js'},
      '@angular/forms'                  : {main: 'bundles/forms.umd.min.js'},
    '@angular/platform-browser'        : {main: 'bundles/platform-browser.umd.min.js'},
    '@angular/platform-browser-dynamic': {main: 'bundles/platform-browser-dynamic.umd.min.js'},
    '@angular/material'                : {main: 'material.umd.js'}

  }
});
TypeScriptの設定ファイル。 tsconfig.json
{
  "compilerOptions": {
    "experimentalDecorators": true,
    "module": "commonjs",
    "target": "ES5"
  },
  "exclude": [
    "node_modules"
  ]
}
そして、index.html
<!DOCTYPE html>
<html>
<head>
  <title>Routing Example</title>

  <link href="node_modules/@angular/material/core/theming/prebuilt/indigo-pink.css" rel="stylesheet">

  <script src="node_modules/core-js/client/shim.min.js"></script>
  <script src="node_modules/zone.js/dist/zone.js"></script>

  <script src="node_modules/typescript/lib/typescript.js"></script>
  <script src="node_modules/systemjs/dist/system.src.js"></script>
  <script src="systemjs.config.js"></script>

  <script>System.import('app').catch(console.error.bind(console));</script>
</head>
<body>
  <app>Loading...</app>
</body>
</html>
では、main.tsを見ていきましょう。
import { platformBrowserDynamic } from '@angular/platform-browser-dynamic';
import { NgModule }      from '@angular/core';
import { BrowserModule } from '@angular/platform-browser';
import { AppComponent }  from './components/app.component';
import { HomeComponent } from "./components/home";
import { TestComponent } from "./components/test";
import { routing } from './components/app.routing';

import { LocationStrategy, HashLocationStrategy, APP_BASE_HREF} from '@angular/common';

@NgModule({
    imports:      [ BrowserModule, routing ],
    declarations: [ AppComponent, HomeComponent, TestComponent],
    providers:[{provide: LocationStrategy, useClass: HashLocationStrategy}],
    bootstrap:    [ AppComponent ]
})
class AppModule {}

platformBrowserDynamic().bootstrapModule(AppModule);
ここではブラウザに最初に読み込まれるスクリプトが書かれています。
読み込まれるコンポーネントを見ていきましょう。
app.component.ts
import {Component} from '@angular/core';
@Component({
    selector: 'app',
    template: `
        <a [routerLink]="['/']">Home</a>
        <a [routerLink]="['test']">Test Page</a>
        <router-outlet></router-outlet>
    `
})
export class AppComponent {}
app.component.tsはmain.tsでbootstrap: [ AppComponent ] と定義されているように、一番最初に表示されるコンポーネントです。
ここではaタグにリンクが設定されてます。routerLinkで設定した値がURLの「#」以降に設定されます。
index.htmlの「app」というタグの場所にapp.component.tsの内容は表示されます。

また、後述するHomeComponentやTestCompentの内容はrouter-outletタグの場所に表示されます。 このrouter-outletタグの名前は変えてはいけません。
次にルーティングの設定。
app.routing.ts
import { Routes, RouterModule } from '@angular/router';
import { HomeComponent } from "./home";
import { TestComponent } from "./test";

const routes: Routes = [
    {path: '', component: HomeComponent},
    {path: 'test', component: TestComponent}
];

export const routing = RouterModule.forRoot(routes);
ここではルーティングテーブルが定義されています。
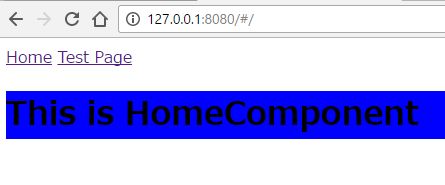
http://127.0.0.1:8080/#/を開こうとすると、
HomeComponentの内容が表示されます。
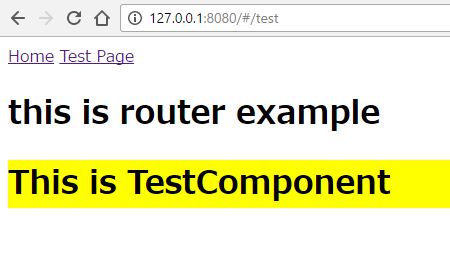
http://127.0.0.1:8080/#/testを開こうとすると、
TestComponentの内容が表示されます。
home.ts
import {Component} from '@angular/core';

@Component({
    selector: 'home',
    template: '<h1 class="home">This is HomeComponent</h1>',
    styles: ['.home {background: blue}']
})
export class HomeComponent {}
これが上で一度見た、HomeComponentの内容です。 This is HomeComponentという文字が表示されます。

test.tsの内容です。
import { Component } from '@angular/core';

@Component({
    selector: 'test',
    template: '<h1 class="test"> This is TestComponent</h1>',
    styles: ['.test {background: yellow}']
})
export class TestComponent {}
以下のように表示されます。


Angular 2 Development With Typescript
- 作者: Yakov Fain,Anton Moiseev
- 出版社/メーカー: Manning Pubns Co
- 発売日: 2016/12/30
- メディア: ペーパーバック
- この商品を含むブログを見る
npmを使ってAngularプロジェクトの雛形を作ってみる
npmを使って、Angularプロジェクトの雛形を作ってみます。
フォルダ構成は以下のとおりです。

今回の目標は、ブラウザにHello Angular2!と表示させるところまでです。
npm init -yコマンドで、まずはpackage.jsonの雛形を作ります。
package.jsonを以下のように編集します。
{
  "name": "angular-seed",
  "version": "1.0.0",
  "description": "An initial npm-managed project",
  "private": true,
  "main": "index.js",
  "scripts": {
    "test": "echo \"Error: no test specified\" && exit 1",
    "start": "live-server"
  },
  "keywords": [],
  "author": "test",
  "license": "ISC",
  "dependencies": {
    "@angular/common": "^2.4.0",
    "@angular/compiler": "^2.4.0",
    "@angular/core": "^2.4.0",
    "@angular/forms": "^2.4.0",
    "@angular/http": "^2.4.0",
    "@angular/platform-browser": "^2.4.0",
    "@angular/platform-browser-dynamic": "^2.4.0",
    "@angular/router": "^3.4.0",
    "core-js": "^2.4.1",
    "rxjs": "^5.1.0",
    "zone.js": "^0.7.6",
    "systemjs": "0.19.37"
  },
  "devDependencies": {
    "live-server": "0.8.2",
    "typescript": "^2.0.0"
  }
}
以下の部分は、npm startコマンドでlive-serverが起動するように設定したものです。
事前にnpm install live-server -yでlive-serverをインストールしておく必要があります。
"scripts": {
"test": "echo \"Error: no test specified\" && exit 1",
"start": "live-server"
},
package.jsonを用意したら、npm installを実行します。
プロジェクトフォルダ直下にnode_modulesフォルダができます。
次に、index.htmlファイルを作成します。
<!DOCTYPE html>
<html>
<head>
  <title>Angular seed</title>
  <meta charset="utf-8">
  <meta name="viewport" content="width=device-width, initial-scale=1">

  <script src="node_modules/typescript/lib/typescript.js"></script>
  <script src="node_modules/core-js/client/shim.min.js"></script>
  <script src="node_modules/zone.js/dist/zone.js"></script>
  <script src="node_modules/systemjs/dist/system.src.js"></script>
  <script src="systemjs.config.js"></script>
  <script>
    System.import('app').catch(function(err){ console.error(err);})
  </script>
</head>
<body>
<app>Loading...</app>
</body>
</html>
<script src="systemjs.config.js"></script>の部分で、SystemJSの設定ファイルを読み込んでいます。
System.import('app').catch(function(err){ console.error(err);})では、main.tsを読み込んでいます。
次に、systemjs.config.jsを作成します。
System.config({
    transpiler: 'typescript',
    typescriptOptions: {emitDecoratorMetadata: true},
    map: {
      '@angular': 'node_modules/@angular',
      'rxjs'    : 'node_modules/rxjs'
    },
    paths: {
      'node_modules/@angular/*': 'node_modules/@angular/*/bundles'
    },
    meta: {
      '@angular/*': {'format': 'cjs'}
    },
    packages: {
      'app'                              : {main: 'main', defaultExtension: 'ts'},
      'rxjs'                             : {main: 'Rx'},
      '@angular/core'                    : {main: 'core.umd.min.js'},
      '@angular/common'                  : {main: 'common.umd.min.js'},
      '@angular/compiler'                : {main: 'compiler.umd.min.js'},
      '@angular/platform-browser'        : {main: 'platform-browser.umd.min.js'},
      '@angular/platform-browser-dynamic': {main: 'platform-browser-dynamic.umd.min.js'}
    }
});
ここの部分では、main.tsとappをマッピングしています。
'app' : {main: 'main', defaultExtension: 'ts'},
マッピングの記載をすることで、System.import('app')のように、マッピング名でimportすることができるようになります。
次に、tsconfig.jsonを作成します。 これは、tscコンパイラのオプションを設定するものです。
{
  "compilerOptions": {
    "target": "ES5",
    "module": "commonjs",
    "experimentalDecorators": true,
    "noImplicitAny": true
  }
}
次に、アプリケーションコードを書いていきます。 app/以下にファイルを置きます。
app.component.tsです。
import {Component} from '@angular/core';

@Component({
    selector: 'app',
    template: `<h1>Hello {{name}}!</h1>`
})
export class AppComponent {
    name: string;

    constructor() {
        this.name = 'Angular2';
    }
}
app.component.tsはコンポーネントを定義するためのファイルです。 次に、app.module.tsを作成します。 こちらは、コンポーネントにincludeするモジュールの宣言を書きます。
import { NgModule } from '@angular/core';
import { BrowserModule } from '@angular/platform-browser';
import { AppComponent } from './app.component';

@NgModule({
    imports: [ BrowserModule ],
    declarations: [AppComponent],
    bootstrap: [ AppComponent]
})

export class AppModule {}
最後に、起点となるmain.tsを作成します。
import { platformBrowserDynamic } from '@angular/platform-browser-dynamic';
import { AppModule } from './app.module';


platformBrowserDynamic().bootstrapModule(AppModule);
AppModuleとしてapp.moduleを取り込み、起動時に実行します。
結果、以下のように表示されます。

TypeScript+AngularでHelloWorldを表示する。
index.htmlはこんな感じ。
<!DOCTYPE html>
<html>

<head>
    <!-- The typescript compiler trancepiles source code into JavaScript right in the browser. -->
    <script src="//unpkg.com/core-js/client/shim.min.js"></script>
    <script src="https://unpkg.com/zone.js@0.6.21"></script>
    <script src="https://unpkg.com/typescript@2.0.0"></script>
    <script src="https://unpkg.com/systemjs@0.19.37/dist/system.src.js"></script>
    <script>
        System.config({
            transpiler: 'typescript',
            typescriptOptions: {
                emitDecoratorMetadata: true
            },
            map: {
                'rxjs': 'https://unpkg.com/rxjs@5.0.0-beta.12',
                '@angular/core': 'https://unpkg.com/@angular/core@2.0.0',
                '@angular/common': 'https://unpkg.com/@angular/common@2.0.0',
                '@angular/compiler': 'https://unpkg.com/@angular/compiler@2.0.0',
                '@angular/platform-browser': 'https://unpkg.com/@angular/platform-browser@2.0.0',
                '@angular/platform-browser-dynamic': 'https://unpkg.com/@angular/platform-browser-dynamic@2.0.0'
            },
            packages: {
                '@angular/core': {
                    main: 'index.js'
                },
                '@angular/common': {
                    main: 'index.js'
                },
                '@angular/compiler': {
                    main: 'index.js'
                },
                '@angular/platform-browser': {
                    main: 'index.js'
                },
                '@angular/platform-browser-dynamic': {
                    main: 'index.js'
                }
            }
        });
        System.import('main.ts');
    </script>
</head>

<body>
    <!-- When the application launched, the <hello-world> tag will be replaced with the
         content of the template from the @Component annotation. -->
    <hello-world></hello-world>
</body>

</html>
以下の部分では、TypsScriptのソースコードをJavaScriptに変換しています。
<script src="//unpkg.com/core-js/client/shim.min.js"></script>
<script src="https://unpkg.com/zone.js@0.6.21"></script>
<script src="https://unpkg.com/typescript@2.0.0"></script>
SystemJSは動的にアプリケーションコードを読み込むライブラリです。
System.import('main.ts');
ここではSystemJSにmainモジュールを読み込むように指定しています。
main.tsは以下のとおりです。
import {Component} from '@angular/core';
import { NgModule }      from '@angular/core';
import { BrowserModule } from '@angular/platform-browser';
import { platformBrowserDynamic } from '@angular/platform-browser-dynamic';

// Component
@Component({
  selector: 'hello-world',
  //templateでは、コンポーネントでレンダリングするHTMLを指定します
  template: '<h1>Hello {{ name }}!</h1>'
})
class HelloWorldComponent {
  //テンプレートとのデータバインディングに使用します
  name: string;

  constructor() {
    this.name = 'Angular';
  }
}

// Module
@NgModule({
  imports:      [ BrowserModule ],
  declarations: [ HelloWorldComponent ],
  bootstrap:    [ HelloWorldComponent ]
})
export class AppModule { }

// App bootstrap
platformBrowserDynamic().bootstrapModule(AppModule);
@Componentのselectorでは、hello-worldタグを見つけて、templateを組み込むようにしています。
これで、
npm install http-server -g
でhttp-serverをインストールし、
http-serverというコマンドを実行します。
すると、localhost:8080で
Hello Angular!
が表示されます。
TypeScriptでクラスやメソッドを定義する。
TypeScriptでクラスを作る構文は以下のとおりです。
class Person {
    firstName: string;
    lastName: string;
    age: number;
    ssn: string;

    constructor(firstName: string, lastName: string, age: number, ssn: string) {
        this.firstName = firstName;
        this.lastName = lastName;
        this.age = age;
        this.ssn = ssn;
    }
}

var p = new Person("John", "Smith", 29, "124-45-67");

console.log(p)
TypeScriptはpublic, protected,privateを設定することができます。
オブジェクトのメンバーのアクセスコントロールのためです。
デフォルトでは全てのクラスメンバーはpublicアクセスとなります。
protectedが設定された場合は、同じクラスかサブクラスからしか見えません。 privateは同じクラスのみから見えます。
TypeScriptでメソッドを定義する
クラスの中で宣言された関数のことをメソッドと言います。 JavaScriptでは、メソッドはプロトライプの中で宣言する必要があります。
class MyClass {
    doSomething(howManyTimes: number) {
        console.log(howManyTimes);
    }

    static doAnything(howManyTimes: number) {
        console.log("anytime " + howManyTimes);
    }
}

var mc = new MyClass();
mc.doSomething(5);

MyClass.doAnything(100);
staticで宣言されたメソッドは、全てのインスタンスとクラスの間で共有されます。 そして、インスタンスを生成しなくても、メンバーにアクセスすることができます。
クラス内でメソッドを呼ぶ場合は、this.doAnyThing(100);というように、thisをつける必要があります。
ゲッターとセッターを追加する
class Person {
    constructor(public _name?: string) {

    }

    get name(): string {
        return this._name;
    }

    set name(value: string) {
        this._name = value;
    }
}

var p = new Person("Takashi");
var p2 = new Person();
p2.name = "Takeshi";

console.log(p.name);
console.log(p2.name);
Visual Studio CodeでTypeScript&Angular2の開発環境を準備する
まずはシェルが必要
Node.jsをインストールする
既にインストール済の場合は、以下を参考にnodeの環境をすること。 npm必須。 14.04 - How do you update npm to the latest version? - Ask Ubuntu
typescriptはnpmでインストールする
npm install -g typescript
https://www.npmjs.com/package/typescript
Gitをインストールする
Code editorはVisual Studio Codeを使う
以下でダウンロード可能。TypeScriptやC#開発に使える。 code.visualstudio.com
TypeScriptを書いて動かしてみる
以下のサイトで練習するのがよい。 www.typescriptlang.org
Spring Bootを起動させてもすぐにShutdownしてしまう場合にやること
こちらの回答の通りにやったらうまくいった。
The only possible explanation i can think of is that tomcat embedded jar is not included in the dependencies/jar. Since you have already defined "spring-boot-starter-web" dependency, it should have transitively pulled the embedded tomcat dependencies as well. But somehow it is excluded.

Things to try out.

Execute "mvn dependency:tree" and check whether the tomcat dependencies exist and in "compile" scope
Change the spring boot starter version to 1.4.0.RELEASE.
 <parent>
        <groupId>org.springframework.boot</groupId>
        <artifactId>spring-boot-starter-parent</artifactId>
        <version>1.4.0.RELEASE</version>
    </parent>
最初、1.5.0.RELEASEなんてしてたのを、1.4.0に変更。 Run as…のRun configurationでMaven Build で、Goalsのところに「dependency:tree」を書いてRun